
P0135 Trouble Code: Meaning, Causes, Symptoms & Fixes
In This Guide
One-line meaning: P0135: Oxygen Sensor Heater Circuit Malfunction (Bank 1, Sensor 1).
What the P0135 Code Means
The P0135 code is one of the most searched check engine light codes, and its full definition is “Oxygen Sensor Heater Circuit Malfunction (Bank 1, Sensor 1)”. In plain English, your car’s engine computer (ECM/PCM) ran its self-test on the heater circuit inside the upstream oxygen sensor on bank 1, and the circuit did not behave the way it should. Here is the point most drivers miss: P0135 is a circuit code, not a sensor performance code. It is telling you something in the heater circuit, wiring included, is not right. It is not necessarily telling you the sensor itself has failed.
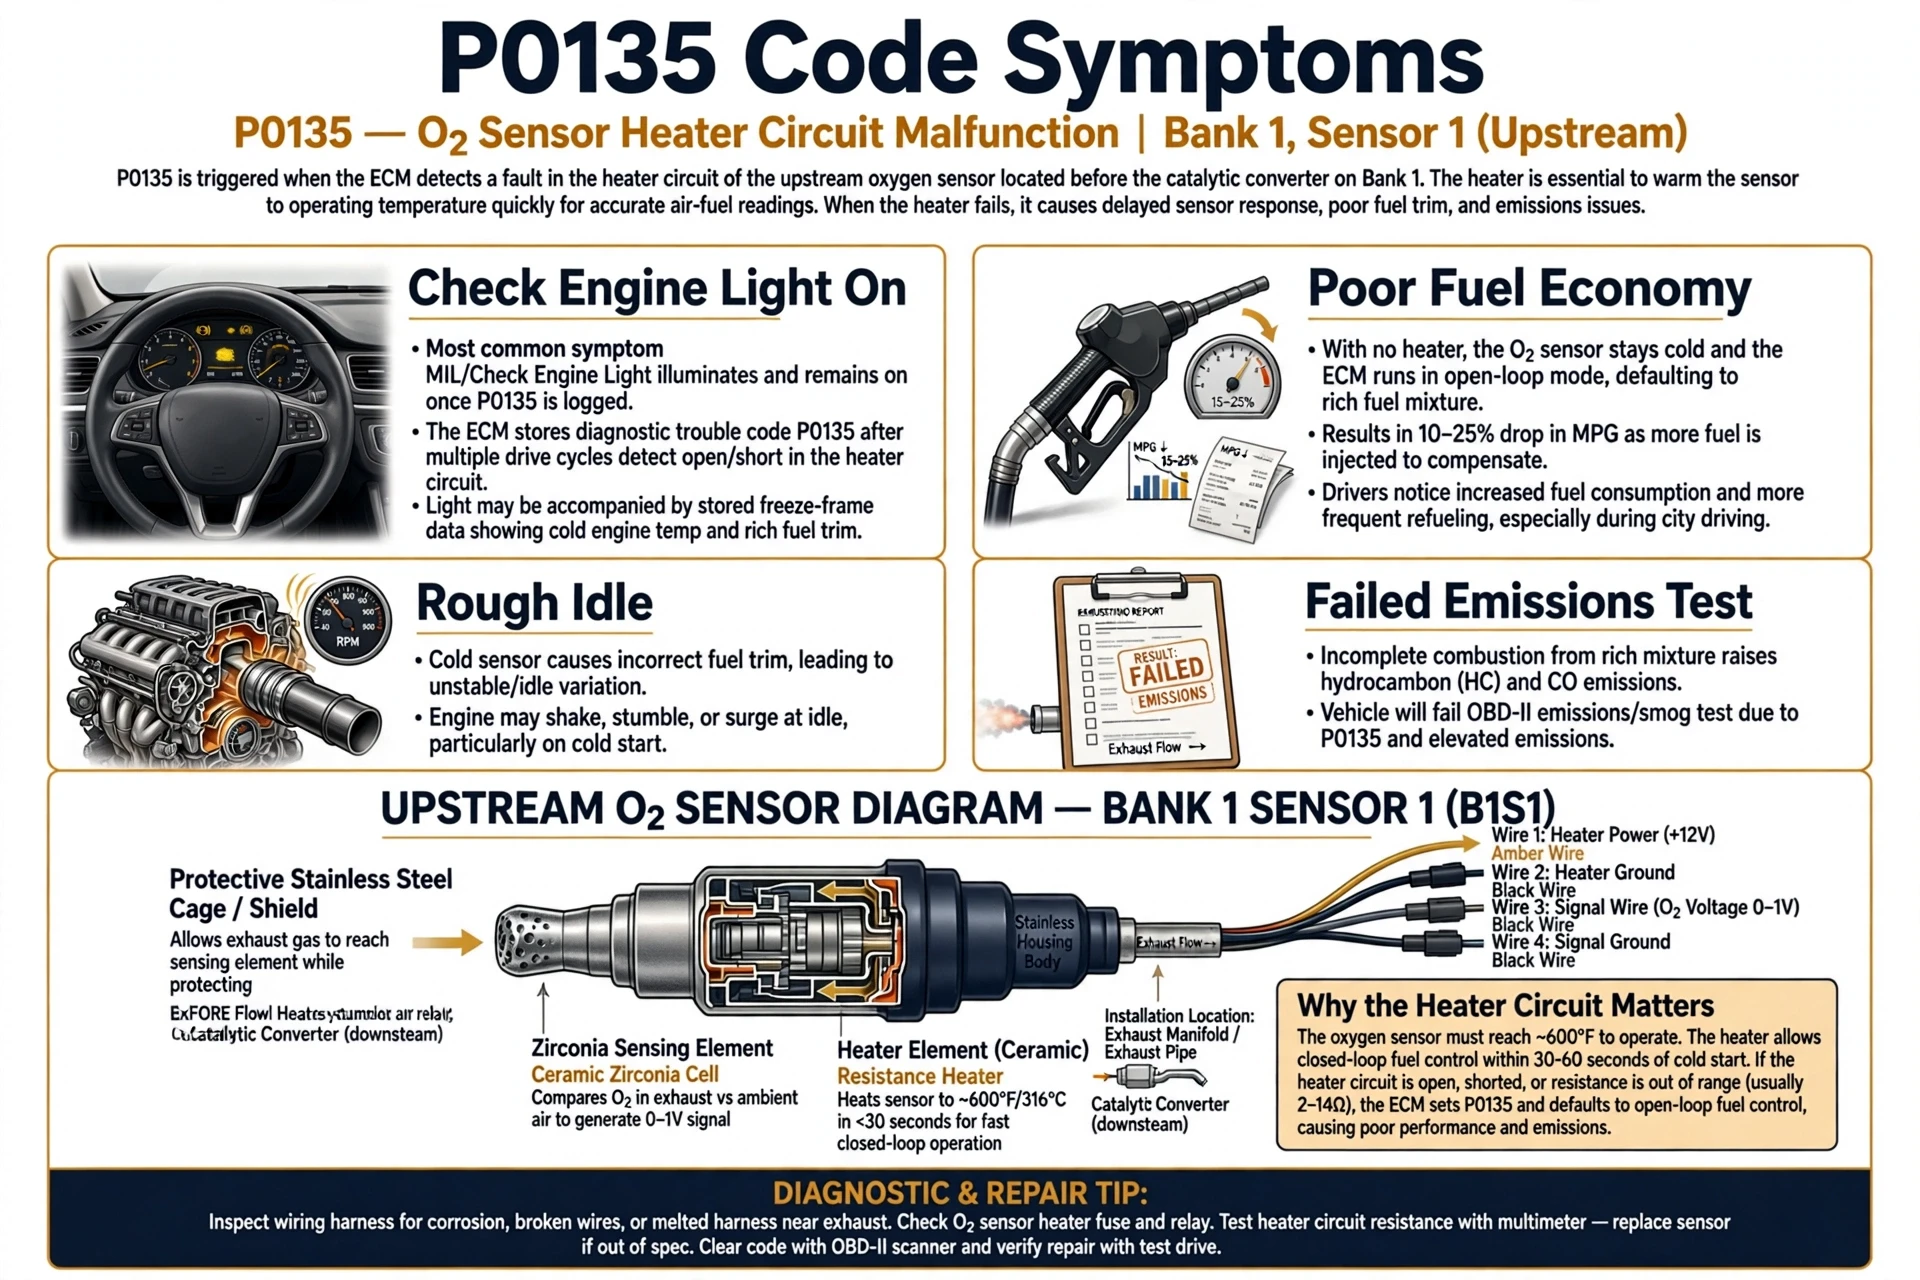
To understand the code, it helps to know what the heater does. An oxygen sensor only sends accurate air-fuel ratio readings once it reaches about 600°F (315°C). Waiting for hot exhaust gas to warm it up would take too long, especially on a cold start, so modern oxygen sensors have a small electric heating element built in. That heater brings the sensor to operating temperature in under a minute, which lets the computer enter closed loop fuel control quickly and keep emissions low. Every time you start the engine, the computer powers the heater and watches the current draw and resistance. If it detects an open circuit, a short, or the wrong amount of current or resistance, it stores engine code p0135 and turns on the check engine light.
Bank 1 sensor 1 is the upstream oxygen sensor: the one threaded into the exhaust manifold or exhaust pipe before the catalytic converter, on the side of the engine that contains cylinder number 1. On a four-cylinder engine, bank 1 is the only bank. The p0135 code is a generic powertrain code, which means it carries the same meaning on every make and model, from a Honda Civic to a Ford F-150 to a Toyota Camry. Its mirror image is the P0155 code, the exact same heater circuit fault but for bank 2 sensor 1 on a V6 or V8. Close cousins in the same family include P0141 (bank 1 sensor 2) and P0161 (bank 2 sensor 2).

Symptoms of the P0135 Code
In many cases, the check engine light is the only symptom you will notice. Because the fault sits in the heater and not in the sensor’s ability to read oxygen once hot, the car often drives normally after the exhaust warms the sensor naturally. Still, depending on the vehicle, you might notice:
- Check engine light on, often setting immediately after a cold start
- Rough idle or hesitation during warm-up, until exhaust heat brings the sensor online
- Reduced fuel economy, because the computer holds a richer cold-start mixture longer than it should
- A strong fuel or exhaust smell on cold starts, and in some cases black smoke from the tailpipe
- Failed emissions inspection, since the lit check engine light is an automatic failure in most states
What is code P0135 trying to tell you? In short: the computer cannot trust the upstream oxygen sensor right after startup, so fuel control stays in its less precise warm-up mode longer than designed.
Common Causes of P0135
The most common cause of engine code p0135 is a burned-out heater element inside the upstream oxygen sensor. The heater switches on at every cold start, and after years of heat cycling the element simply breaks and the circuit goes open. But because P0135 is a circuit code, the wiring and power supply deserve equal suspicion. Here are the causes, most likely first:
- Failed oxygen sensor heater element: the internal heater burns out and the circuit goes open. This is the single most common cause.
- Damaged wiring: frayed, melted, or chafed wires leading to the sensor connector, often where the harness runs against the hot exhaust manifold.
- Blown heater fuse or bad relay: a blown fuse or failed relay means no power reaches the heater circuit at all.
- Corroded or loose connector: moisture, dirt, or spread pins at the oxygen sensor connector create high resistance the computer reads as a fault.
- Heater circuit shorted to power or ground: damaged insulation lets the heater wires touch each other, the exhaust, or the chassis.
- Engine coolant temperature sensor issues: rare, but if the computer gets wrong temperature readings, its heater circuit self-test can misbehave.
- PCM/ECM fault or outdated software: rare. The computer itself misreads a healthy circuit. Diagnose this last, after everything else tests good.

How to Diagnose P0135 (Do This Before Buying Parts)
Mechanics see the P0135 code misdiagnosed constantly, because people replace the sensor without testing the circuit. The code points at the whole heater circuit, so work through it in order, cheapest checks first:
- Check the heater fuse first. Find the oxygen sensor heater fuse in your owner’s manual or fuse box diagram and pull it for a visual check. A blown fuse is a five-minute fix. If the replacement fuse blows again right away, you have a short somewhere in the circuit, so keep looking instead of feeding it fuses.
- Inspect the wiring and connector. Trace the harness from the bank 1 sensor 1 connector back toward the main harness. Look for melted insulation, chafing against the exhaust manifold, and green corrosion or moisture inside the connector. With the engine running, gently wiggle the connector and harness while watching for the code to reset.
- Test the heater with a multimeter. Unplug the oxygen sensor, set your multimeter to ohms, and probe the two heater-circuit terminals on the sensor side of the connector (check a wiring diagram for your vehicle; on many four-wire sensors the heater wires are the same-colored pair). A healthy heater reads roughly 3 to 30 ohms. Zero ohms or infinite resistance (open line) means the heater element is dead and the sensor must be replaced.
- Check for power and ground at the harness side. With the sensor unplugged and the key on, you should see battery voltage on the heater power wire. No power there means the fault is upstream: fuse, relay, or wiring between the fuse box and the connector.
- Only then condemn the sensor. If the fuse is good, the wiring is intact, power reaches the connector, and the heater resistance test fails, the sensor is bad. Replace it with the correct upstream sensor for bank 1. Fitment matters, so confirm the part against your exact year, make, and model before ordering.

How to Fix the P0135 Code
The right fix depends on what your diagnosis found:
- Replace a blown heater fuse: the cheapest fix of all. If the new fuse blows again, find and repair the short before replacing it twice.
- Repair damaged wiring or connectors: splice, solder, and heat-shrink chafed wires; clean out corrosion and re-pin loose connector terminals.
- Replace the upstream oxygen sensor (bank 1 sensor 1): the fix when the heater element itself has burned out. Use an OEM or quality direct-fit sensor with the correct connector for your vehicle.
- Replace a bad heater relay: if the relay feeding the heater circuit has failed, the sensor never gets power.
- Repair or replace the PCM: rare, and only after the fuse, wiring, connector, and sensor all test good.
After the repair, clear the code with your scanner and confirm it stays gone through a full cold start, since the computer re-tests the heater circuit every time the engine starts cold.

P0135 Repair Costs
Drivers always ask how much it costs to fix P0135, and the answer depends entirely on which part of the circuit failed. Here are typical ranges:
| Repair | Cost Range |
|---|---|
| Heater fuse replacement | $5 – $20 |
| Wiring or connector repair | $80 – $250 |
| O2 sensor replacement (DIY, part only) | $25 – $120 |
| O2 sensor replacement (shop, parts + labor) | $150 – $350 |
| Professional diagnosis | $100 – $150 |
| PCM replacement (rare) | $500 – $1,200+ |
This is why diagnosis matters. A $10 fuse fix and a $300 sensor job share the same P0135 code.
DIY vs Mechanic Verdict
You can do this at home: checking the heater fuse, visually inspecting the wiring and connector for damage, and testing heater resistance with a multimeter. Replacing the upstream oxygen sensor is also a solid DIY job on most vehicles with basic hand tools (an oxygen sensor socket makes it much easier).
See a mechanic for: wiring faults buried deep in the harness, intermittent shorts that need professional equipment to catch, or any diagnosis that points toward the PCM.
Bottom line: test, do not guess. Twenty minutes with a multimeter separates a $10 fuse fix from a sensor you never needed.
Can You Drive With a P0135 Code?
Generally yes, for a short time. This code affects emissions monitoring more than engine control directly, so the car will usually run normally once exhaust heat warms the sensor. But fix it soon: you will burn extra fuel on every cold start, the engine may run rough during warm-up, and running too long with poor fuel control can stress the catalytic converter. And you will not pass an emissions inspection with the check engine light on.
P0135 on Popular Vehicles
P0135 shows up across all brands, but some patterns are worth knowing:
- Honda (Civic, Accord, CR-V): the P0135 Honda code is extremely common. On high-mileage cars the heater element simply burns out, but always check the under-hood fuse and the harness where it crosses the exhaust manifold first.
- Toyota (Camry, Corolla, RAV4): the P0135 Toyota code is usually the sensor itself past 100k miles. Use a direct-fit sensor, since universal splice-in sensors cause comebacks on Toyotas.
- Nissan (Altima, Sentra, Rogue): for the P0135 Nissan code, inspect the wiring before buying parts. Heat damage to the harness near the exhaust manifold is a known issue on several Nissan models.
- Chevy / GM (Silverado, Malibu, Equinox): the P0135 Chevy code often starts at the fuse box. Check the heater fuse and relay before condemning the sensor, especially on trucks.
- Ford (F-150, Escape, Explorer): the P0135 Ford code sometimes follows exhaust work. If the sensor was recently touched, suspect the connector seating and the wiring routing first.
P0135 is part of a heater circuit code family: P0135 (bank 1 sensor 1), P0155 (bank 2 sensor 1), P0141 (bank 1 sensor 2), and P0161 (bank 2 sensor 2). The diagnostic approach is the same for all four.
P0135 vs P0155
P0135 is bank 1 sensor 1. P0155 is the mirror image for bank 2: “Oxygen Sensor Heater Circuit Malfunction (Bank 2, Sensor 1)”. Same test, same causes, same fixes, just the upstream sensor on the other bank of a V6 or V8 engine. On a four-cylinder engine you will never see P0155, because there is no bank 2. If both codes appear together, look for a shared cause, such as a blown heater fuse or a failed relay feeding both sensors.
Related Codes
- P0155: Oxygen Sensor Heater Circuit Malfunction (Bank 2, Sensor 1)
- P0141: Oxygen Sensor Heater Circuit Malfunction (Bank 1, Sensor 2)
- P0161: Oxygen Sensor Heater Circuit Malfunction (Bank 2, Sensor 2)
- P0130: O2 Sensor Circuit Malfunction (Bank 1, Sensor 1) (a sensor signal code, not a heater code)
- P0131 / P0132: O2 Sensor Circuit Low / High Voltage (Bank 1, Sensor 1)
Video Walkthrough
Watch the video above for a visual walkthrough of P0135 causes and diagnosis before you read on.
Frequently Asked Questions
What is the most common cause of a P0135 code?
A burned-out heater element inside the bank 1 sensor 1 oxygen sensor. The heater switches on at every cold start, and after years of heat cycling the element breaks and the circuit goes open. Damaged wiring and a blown heater fuse are the next most likely causes, so test those before buying a sensor.
Can I still drive my car with a P0135 code?
Yes, for short trips. The engine usually runs normally once exhaust heat warms the sensor. Still, fix it soon: cold-start fuel economy suffers, the engine can run rough during warm-up, and the check engine light is an automatic emissions test failure.
How do you fix the code P0135?
Diagnose first. Check the heater fuse, inspect the wiring and connector for damage, then test heater resistance with a multimeter: 3 to 30 ohms is healthy, while zero or infinite resistance means a dead heater. Replace the fuse, repair the wiring, or install a new bank 1 sensor 1 oxygen sensor based on what failed, then clear the code and confirm it stays gone after a cold start.
How much does it cost to fix P0135?
A DIY repair costs $5 to $120 for a fuse or a replacement sensor. At a shop, sensor replacement with diagnosis and labor typically runs $150 to $350. Wiring or connector repairs land between $80 and $250.
Will P0135 clear itself?
Rarely. A one-time electrical glitch can clear after several drive cycles, but a burned-out heater element or damaged wiring fails the computer’s cold-start heater test every time, so the code comes back, usually the next morning.
Which sensor is bank 1 sensor 1?
Bank 1 is the side of the engine that contains cylinder number 1. Sensor 1 is the upstream oxygen sensor, threaded into the exhaust manifold or pipe before the catalytic converter. On a four-cylinder engine, bank 1 is the only bank.
Does the P0135 code mean my catalytic converter is bad?
No. P0135 is strictly a heater circuit code for the upstream oxygen sensor. A failing catalytic converter sets efficiency codes like P0420, never a heater circuit code. If you have both codes stored, fix the P0135 circuit fault first and then recheck.
Conclusion
The P0135 code looks technical, but it is really your car asking for a simple circuit test, not an automatic sensor replacement. Check the fuse, inspect the wiring, and let a multimeter make the decision. Fix the actual fault and the code stays gone.
About the author: Written by the OBD2 Code Hub editorial team. Our diagnostic guides are built from real OBD-II data, manufacturer service procedures, and hands-on troubleshooting experience, then reviewed for technical accuracy before publishing. We drive the same cars you do.